Sunday, May 2, 2010

Flowers and Leaves


Instructions
1. Wash the papaya, cut it into three-inch-long sections, peel them, and then cut in half lengthwise.
2. Carve a rose bud in the center of the flower. Carve six expanded petals radiating from the center, cut two curves in the outer edge of each petal, and remove flesh from beneath.
3. Carve the six pointed petals of the second circle, centering them between the petals of the first circle. On the upper surface of each, cut two grooves.
4. Cut the outline of the leaf, make grooves to represent the midrib and veins, and notch the edges. Gently trim the remaining flesh away from the flower and leaf.

Carved Apple


Instructions
1. Wash the apples.
2. Begin carving the first flower by creating the center. Make cuts to form the petals and remove flesh from the cuts.
3. With the tip of the knife, cut curved expanded petals around the center and remove flesh from beneath to make them stand out.
4. Around and centered between these carve a circle of pointed petals.
5. To one side and below, carve a second flower in the same way. Then, carve a third to one side and above the second. Continue in this way around the fruit. When done, carve leaves around the flowers.
6. Peel the areas that are not carved and then soak the apple in salt water to prevent from darkening.

Stylized Lotus


Instructions
1. Make a shallow slice to cut off the stem end.
2. Make cuts down the side of the melon to divide it into 12 uniform sections. Cut under these sections to make the outer ring of 12 petals. These should be about one quarter of a centimeter thick.
3. Divide the melon into 12 sections centered between the petals of the outer ring to make a second and then a third ring of petals. Next, remove the seeds mid membrane at the center.
4. Notch the borders of the petals attractively, starting with the middle ring and then moving to the inner ring.
5. Notch the borders of the petals of the outer ring more deeply and cut a shallow groove in each.

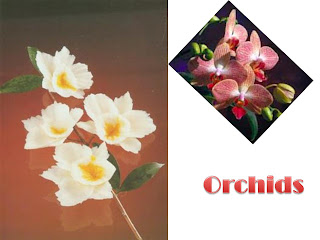
Orchids


Instructions
1. Cut the tubers in half from top to bottom.
2. Cut into the center of the flat side with the carving knife and then make a circular cut around the center. While cutting, twist the wrist up and down slightly to give the center of the flower a wavy surface.
3. Carve the two large petals on opposite sides of the center, again twisting the wrist slightly to give them a wavy surface. Remove the flesh to the sides of the petals.
4. In the same way, carve the two small petals between the large ones.
5. Remove the flesh from beneath the petals and you will have a white orchid. Use a paintbrush to daub the center of the flower attractively with yellow food coloring.

Saturday, May 1, 2010

Leafy Mangoes


Instructions
1. Wash the mango. Around the stem of each, cut five rounded petals as in the picture.
2. Remove the remaining skin. With the knife tip, cut leaves of equal size radiating from the petals around the circumference of the fruit.
3. With the tip of the carving knife, give the leaves graceful curves, and then cut grooves to represent the midribs and veins. When finished, remove some flesh from under the leaves.
4. Make the second circle of leaves in the same way, centering them between those of the first circle. Continue until the entire fruit is carved.

Covered Bowl


Instructions
1. With the tip of the carving knife, lay out a five pointed star around the stem of the guava, and then deepen the cuts so that the guava separates in two, thus forming the bowl and the cover.
2. With the melon scoop, hollow out the inside of the bowl, and then wash it well.
3. Begin carving the outer surface of the bowl. Make a cut parallel to the edges of the mouth all the way around the fruit and then remove a little flesh from the cut to make a groove. With the carving knife, make a V-shaped groove in each of the five protrusions. Insert the tip of the carving knife into the flesh toward the base end of the groove; make a cut to form the edge of the leaf, twisting the wrist to make the edge wavy. Make the other edge of the leaf in the same way. Remove some flesh from beneath the edges and cut grooves to form the veins of the leaf as in the picture.
4. In the same way, make another leaf surrounding the first but without cutting grooves for veins. Make leaves on the other four protrusions and then cut V-shaped grooves in the surface of the fruit around the leaves.

Nested Star Flowers


Instructions
1. Wash the sapodillas.
2. Make a small circular cut and remove some flesh from around the circle to form the center of the flower.
3. Lay out five pointed petals radiating from the center and groove them down the center.
4. With the tip of the knife, make a cut on one side of each petal from the base to the tip, moving the wrist back and forth. Make a similar cut on the other side of the petal, and then make cuts on each side one millimeter from and parallel to the first two. Do the same for all five petals and then remove flesh from beneath them.
5. Make the second circle of petals in the same way, centered on those of the first circle. When complete, peel the skin from the center and cut crisscrossing grooves in it.

Rose-apple Blossom


Instructions
1. At the flower end of the rose-apples, make slices in a circle through the wall of the fruit and then carefully pull the flower seed and membrane out.
2. Use the stem ends to make flowers. With the tip of the carving knife, form four pointed petals, and then cut through the outer face of each petal to make another smaller petal inside it.
3. Make the centers of the flowers from red apple peel. Cut the apple peel into disks and insert in the center of the flowers.

Bua Din Flower


Instructions
1. Cut off the roots and leaves of the leek and cut out a section about three inches long from the base.
2. Make cuts through the outermost leaf layer lengthwise from one end nearly to the other to divide it into five parts.
3. In a similar manner, make cuts through the next leaf layer dividing it into five parts. The centers of these strips should be between those of the outer ring. Continue in this manner to the innermost leaf. Then, separate the strips from each other with the fingers.
4. Round off the tip of each strip with the scissors, and then soak the flower in very cold water so that the petals curl.

Two-toned Marigold


Instructions
1. Wash the leeks.
2. Cut off the roots and the leaves, and cut into sections about three inches long from the base.
3. With the tip of the knife, make longitudinal cuts through the outermost leaf to produce eight petals. In the same way, slit the next leaf into eight petals so that their centers are between those of the outer petals. Continue in this way to the innermost leaf.

4. Curl the petals, working from the outside in.

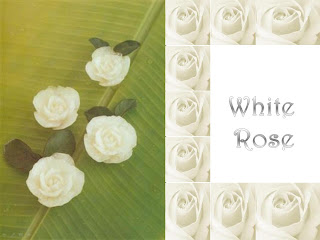
White Rose


Instructions
1. Cut the Chinese radish into sections about 1½ inches long. Beginning at one end, cut away the peel and the flesh, holding the knife at a 45 degrees angle.
2. Turn the tapered end downward and carve a curved petal. Trim to remove angles and then carve the next petal so that it overlaps the first about halfway.
3. Once the outermost ring of petals has been formed, remove the flesh from around the petals, and then make the second ring in the same fashion, but positioning the petals between those of the outer ring. Keep the point of the knife angled towards the center so the petals remain close together as in an opening blossom. Continue on to the center.

Shallot Lotus


Instructions
1. Wash the shallots.
2. With the point of the knife, make zigzag cuts extending to the center around the circumference of each shallot, and then separate the two halves.
3. Separate the layers of each half of the shallot, and then nest the layers one inside the other once again, centering the petals of each layer between those of the adjacent layer to form a lotus flower.

Blossoming Rose


Instructions
1. Select bright red tomatoes with no bruises and wash them.
2. Cut the tomato through the middle into two halves.
3. Cut the halves into slices about ¼ cm. thick, working from the stem end to the base.
4. Roll up one slice to form the center. Wrap three more slices around this, and then place other slices around so that they are centered between the inner petals. Use about twelve slices in all.

Sugar Cookies Decoration


This method for decorating sugar cookies is perfect for kids, because it's easy. First you paint on a corn syrup glaze, and then add sprinkles and other decorations. You will need:
• Baked sugar cookies, cut into festive shapes
• 1/4 cup light corn syrup (more if you have more than 30 cookies)
• A clean, never-used paint brush
• Colored sugar and/or sprinkles
• Gel icing and/or cookie icing for decorating
Pour 1/4 cup of the corn syrup into a microwave-safe container. Heat on high 4-10 seconds, depending on the strength of your microwave. You want the corn syrup to spread easily, but you don't want it to be so thin that it just drizzles off the cookies.
Dip the clean paint brush in the warmed corn syrup and paint it onto the cookies. If you want to make a pattern, such as stripes, just paint the corn syrup on the cookies in stripes (see Step 4 for what the cookies will look like).
Sprinkle colored sugar over the cookies generously to make sure the sugar adheres well to the corn syrup glaze.
Tilt the cookies to the side, pouring off the excess colored sugar. If you painted stripes on the cookies, you will see the sugar adhered only to the corn syrup stripes, not the whole cookie. If you painted the whole cookie, this step just lets you clean up the cookies a bit.
Now you can outline the cookies with gel icing or cookie icing, or draw in stripes if you're decorating stocking cookies or candy canes.

Chocolate Rose


• Begin with one-half pound of chocolate plastic. Start kneading your chocolate plastic until it is smooth and supple. If you are using white chocolate plastic, knead it in powdered sugar, and if you are using milk or dark chocolate plastic, knead it in unsweetened cocoa powder. If the plastic is too hard to knead, microwave it in five-second intervals just until it becomes pliable. Do not microwave it too long, or it will be too soft to work with.
• Dust your work surface and a rolling pin with powdered sugar or cocoa powder, and roll the chocolate plastic out into a very thin layer. If you are working with a large amount of chocolate plastic, you might want to divide it in half and roll it out in batches.
• Make sure your chocolate plastic is rolled into a very thin layer, less than 1/8" thick.
• Use a small round cutter to cut circles from the plastic. For one full-sized rose, you will need nine circles, and for rosebuds, you will need 4-5. The size of the circle cutter determines the size of your finished rose. A 1.5” cutter will yield a full-sized rose that is approximately 3” wide.
• Begin by forming the center of your rose: take one of the cut circles and roll it into a cylinder. Leave a small hole at the top of the cylinder, and a larger hole at the bottom.
• Take another circle, and use your fingers to flatten one end of it until it is paper-thin. This will be the top of the petal, and it helps give the rose a more delicate look. You will repeat this thinning step with every petal you put on the rose.
• Wrap your first petal around the cylinder, making the top of the petal level with the top of the cylinder, pressing it at the bottom to adhere the chocolate plastic. To make a rosebud, curve the edge of the petal inward slightly, so that it partially covers the center of the flower. If you want a flower in full bloom, curve the edge of the petal outward slightly.
• Thin out the edge of another circle, and overlap it over the first petal. Add a third petal overlapping the second to complete the first layer of petals. If you want to make a rosebud, your flower is now complete. To make a full rose, continue to the next step.
• Use the remaining five petals to add a second layer to the rose, thinning the top edges as before, and overlapping the petals as with the first layer. Curl the outer petals back slightly to make your rose bloom. Pinch off any extra plastic at the base of the flower, and re-roll it with the plastic scraps to create more roses.
• Your chocolate roses are now complete! Allow the roses to sit at room temperature and dry for 24 hours. Once set, they can be stored in an airtight container indefinitely.